Friday, March 2, 2012
Illustrator Tutorial: How to Draw a Vector Kiwi
Do you like this story?

Ever wonder how to make a vector kiwi in Adobe Illustrator? Well I did and here is what I came up with. In this tutorial, I will teach you how to do it using illustrator effects like Texturizer, Pointillize, Grain and Film grain. Hope you can learn some new stuff in this tutorial.
Drawing the Kiwi Shape
Open a new document. Set it at any size that you want in RGB mode. The first step is to find some colors to use in this tutorial. For that, we will go to Windows>Adobe Labs>kuler and type the word kiwi in the search box. I found some interesting color scheme that I like and I saved them in my Swatches panel. If you like other colors feel free to use them.
Next, take the Ellipse tool and draw am oval shape like the one below and rotate it a little so that it looks more natural. Fill it with the gradient that you see in the image. Colors are: (224,238,174); (175,212,34); (137,96,58).

Drawing the Kiwi Fruit Pulp
Now we will start creating the fruit pulp. Go to Brushes Panel and click the Brush Libraries menu or go to Windows>Brush Libraries>Artistic>Artistic_Ink and find the brush that you see in the image below.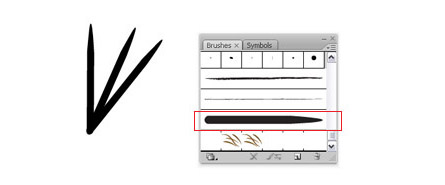
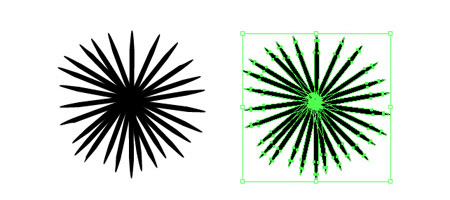
Go to Object>Transform>Transform Each. Set the Rotate angle at different angles and press copy to get a random look. Repeat this steps until you have a circle of fruit pulp.

You should have something like this. Go to Object>Expand Appearance and ungroup them by pressing Crl+Shift+G/Command+Shift+G. Continue editing the shape until you are happy with the results, like what I did. This will make our kiwi look more natural later on.
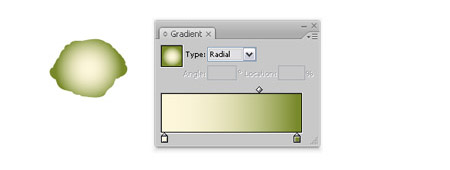
Next, we will add some color. Use the colors: (163,126,78), (192,226,33), (224,238,174) for the gradient and fill the shape with a radial gradient as shown below.

Position the shape in the center of our kiwi. Set it to Multiply and lower the Opacity to 33%.

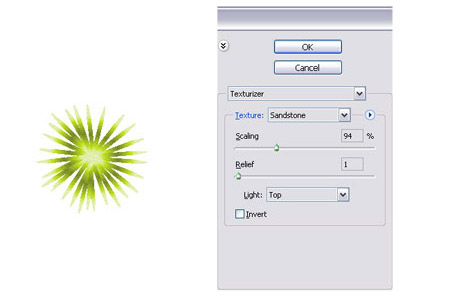
For a more realistic look, we will create 2 more shapes. Copy and paste the shape that we just created and we will apply some effects to it. Go to Effect>Texture>Texturizer and set the values as shown below.
Next, go to Effect>Stylize>Outer Glow and set the values as shown below.

Now, position the shape on top of the first one. Set the mode to multiply and the opacity to 48%.

To give it more depth, copy and paste the first shape again. Make it half the size and position it on top of the others. Set it to multiply and lower the opacity to 40%. You will end up with something like in the image below.

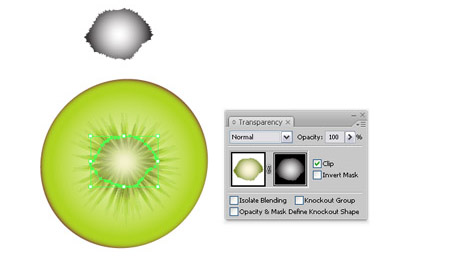
Now, we will make the heart of the kiwi. Just take the pencil and draw a random shape like the one below and fill it with the radial gradient shown. Colors are: (252,246,218) and (119,137,42). Next, apply the Pucker and Bloat effect. This will make the shape blend better in the midlle of the kiwi.

Next, copy and paste in front this shape and fill it with a radial gradient from white to black. Select both shapes, go to Transparency panel and select Make opacity mask from the dropdown menu. You will end up with something like in the image below.
Drawing the Kiwi Seeds
It’s time to create the kiwi seeds. Take the Ellipse tool and create 3 oval shapes. I colored them one dark brown, one black and one filled with a radial gradient from black to white for a different look. When you are done, group them together and drag them in the Symbols panel.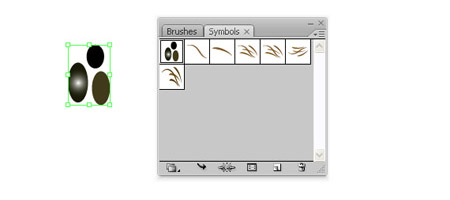
Now, select the Symbol Sprayer tool and start spraying the seeds. Also use the Symbol Shifter and the Symbol Sizer to get a more random and natural look. For a more detailed look, group the seeds together. Copy and rotate them a little so they don’t overlapp and reduce the opacity to 40%. See the image below.

Drawing the Kiwi Skin
We are done with this part, now let’s draw the outside skin of the kiwi and the little “hair” on top. For that, go to the Symbols panel, click and select the Symbol Libraries Menu>Hair and Fur and select some of the brown hair symbols that you like best. I created something like in the image below. Then drag it to the symbols panel so we can use it further. Now take the brush tool and select our symbol. Start brushing the left side of the kiwi with this ‘hair’. I made some little segments with this brush so I can twist and modify each one to look more natural. Feel free to arrange them until you it looks natural. I got something like in the image below.
It’s time for the outside skin of our kiwi. Take the Ellipse tool and draw a shape of a kiwi and fill it with this color (135,98,57). Now, we will apply some effects on it. Go to Effects>Texture>Grain and set the values shown below.

Go to Effects>Artistic>Film Grain and set the values like below. You will have something like this:

Now, positon this shape in the back of our kiwi and arrange it to look natural. I also added some extra ‘hair’ on top of it with the symbol that we created earlier and with the method explained earlier. Now, we have something like this as shown below.

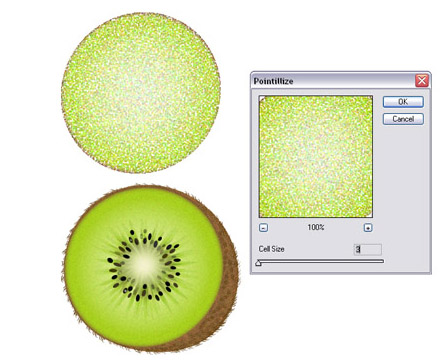
But our kiwi seems to be missing something and the work is not done yet. It needs more texture to make it look realistic. Copy and paste in front the pulp shape of the fruit (the green one). I have moved the shape away so that you can see the effect. But you can just paste it in front of the original. Go to Effect>Pixelate>Pointillize and set the values below. Then lower the opacity to 20%.
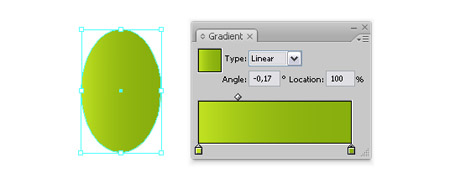
I decided to add a few water drops. To make them, take the Ellipse tool and create the shape from the image below and fill it with a linear gradient using the colors: (192,226,33), (136,175,14).
Create a second shape smaller than the first one and fill it with a radial gradient using the colors: (224,238,174), (175,212,34).

Place the second shape on top of the first one like in the image below and create 3 more shapes to add more glow to the water drop. Use a white fill on one and fill the other two using the same gradient like the second shape we made previously.

Now, arrange all the shapes as shown below. Lower the opacity for the white shape to 40% and group them all. Also reduce the opacity of the group to 25-35% depending on the size of your kiwi.

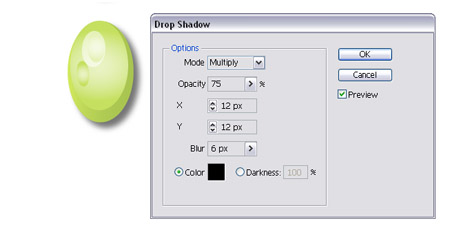
Go to Effects>Stylize>Drop Shadow and set the values as shown below.
Now, we just have to make more copies in different sizes and place them on top of the kiwi. Adjust the opacity for each of the water drops only if necessary. The illustration is done. Here is the final image of our fresh and tasty kiwi.
Hope you have enjoyed reading it and learnt some useful techniques in illustrator.

This post was written by: Franklin Manuel
Franklin Manuel is a professional blogger, web designer and front end web developer. Follow him on Twitter
Subscribe to:
Post Comments (Atom)


0 Responses to “Illustrator Tutorial: How to Draw a Vector Kiwi”
Post a Comment